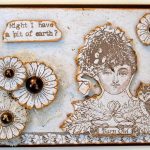
Fairy and Angel Christmas Shaker Decoration. This Christmas decoration was made for a group swap, Winter Wonderland. For the image I used Panduro paper. Unfortunately I don’t think this paper is made any more but any Christmas scene can be used instead.

Angel and Fairy Christmas Shaker Decoration

Elements used in making the Angel and Fairy Christmas shaker decoration
The first thing I did was to cut out the elements needed. I used two crinkly circle dies to cut two plain white card circles and a circular image of the same size. It is a good idea to put double sided sticky tape on one of the plain cards before cutting. It makes life a lot easier.
On the plain circle which does not have sticky tape, cut a small circle offset a little as shown in the picture above. It needs to be offset to allow room for embellishments. For the fairy, I used a Tattered Lace fairy die. If you don’t have this die you can substitute with something else.

Fairy diecut covered with black Versafine ink

I originally cut the fairy out in silver card, but I wasn’t too keen on how it looked, so I cut another out in a scrap of leftover paper, covered it with Versafine black ink and embossed it with silver tinsel coloured embossing powder. It curled up a bit with the heat gun but this added a bit more dimension.
I then stamped the edge of the circle with Lavinia Stamps star stamp and embossed them with the embossing powder. Once this was done I attached acetate to the back and used double sided foam tape around the back. I used seed beads to put in the shaker. I mounted the image onto the plain circle with the sticky tape and then mounted it onto the shaker. I used some silver ribbon as a hanger by sticking it between the shaker decoration and a circle of patterned paper. To finish it off, I adhered some flat back pearls and Bling on a Roll.